How do we design & fabricate our carved wood and HDU signs and plaques?
Land on this page from a search? We have over 12,000 photos of beautiful and interesting custom carved wood and urethane signs and plaques on this website. Click on the dark gray Home tab on the header above (left side) to get an overview of the company and its products. You can click on one of the numbered gray boxes in the lower left margin to view one of 45 photo Galleries for various applications.
There are several techniques that different manufacturers use to make custom dimensional signs & plaques. Art Sign Works uses a very cost and labor efficient approach which uses precision computer-aided-design and manufacturing (CADAM) technology which produces very high quality custom signs and plaques that are hand-crafted yet affordable. All our signs and plaques are made in the USA using American craftsmen; we do not make any of our plaques in China, Vietnam or the Philippines, like some of our US competitors do for wall plaques.
Our current computer design software, along with numerically-controlled machine technology, has resulted in a large increase in productivity and quality, as well allowing us to price economical prices to our customers. We have taken full advantage of this technology by investing over $500,000 in the latest computer and Computer-Numerically-Controlled (CNC) machines and software. Even with this technology, carving and painting custom wood and HDU signs and plaques is still very labor-intensive and time-consuming, and requires experienced craftsmen who are expert in woodworking and precision painting to make our custom signs. Each sign or plaque undergoes 18 to 22 separate manufacturing operations in our 7 different workshops (computerized design shop, CNC router shop, wood shop, metal shop, spray paint shop, fine painting and finishing shop, and crating and packing shop). The minimum time to make a sign or plaque, from start to finish, is 21 days, because we use up to 5 different powered machines, 4 or 5 CNC router tool bits, and perform extensive hand-trimming, masking, and hand-sanding, and require more than a week to dry the 8 to 10 coats of primer, background paint, trim and lettering paint, and clear-coats. Although we use a paint spray booth to apply our coatings, all of the fine painting is done by an expert artist with a micro-roller, airbrush, or artist brush, which takes 2 to 10 hours per sign. We used heated drying rooms to ensure a hard, resilient finish.
Manufacturing custom signs is entirely different than manufacturing mass-produced products where millions of identical products are made on an assembly line with special purpose machines built for stamping out 5 to 50 identical piece parts per minute, and fabrication and assembly is usually fully automated. For custom signs, every one is different. Each sign requires a specific custom design different from any other sign we have made, and machines used for automation must be very flexible to accommodate a very wide range of material types, sizes, shapes, colors, text fonts, carving relief, etc. Since labor and overhead costs are 2/3 of the cost of a sign, the other 1/3 being raw materials, it is important to be very efficient in the use of skilled labor and concentrate our labor and time on creative, rather than repetitive "no-brainer" tasks.
We use an optimum combination of computer-controlled and hand-crafted operations to produce our custom, unique, one-of-kind signs and plaques. We use the very best premium long-lasting materials, including HDU, redwood, cedar, mahogany, paints, epoxy, metal-coats, and clear-coats. Our computer-aided design and manufacturing (CADAM) approach works equally well with both HDU and wood signs of all sizes, on any custom design from simple text to large signs with elaborate and ornate 3-D bas-relief carved text and art. We rely on computer software and automation, but there are also many steps in the manufacturing process where hand-craftmanship by our artisans is required to produce a high-quality sign or plaque, using hand tools such as chisels, knives, sand-pads, micro-rollers, airbrushes and artist brushes.
The short 1 minute video below shows some of our manufacturing processes.
There are three basic phases in making a dimensional (either 2.5-D or 3-D) sign or plaque. These are described in detail below:
Designing the sign, the creative process, with advanced 3-D geometry model development, and programming the Computer Numerically Controlled (CNC) router/carver and sandblast mask cutter.
Cutting and carving the sign using one of our five large table CNC routers, or a laser engraver, a sandblaster/sand-carver, or power tools and hand carving tools . We perform precision cutting of metal using a CNC water jet cutter.
Priming, spray painting, staining, fine painting with a mini-roller or artist brush, gold-leaf gilding, bronze or brass metal coating, patina coating, buffing and polishing, and finally clear-coating the sign.

Fig 1 - Kevin, our Chief Designer and Production Manager
Kevin Cohn is a highly creative, skilled and experienced graphic artist and designer, and also develops and uses our CADAM software
1. Designing the Sign and Programming the CNC Router/Carver. All of our designs are done by creative, highly-skilled, innovative and artistic sign designers, with many years of experience. We currently have 3 full-time in-house designers and three contract 3-D designers located around the country. We have 4 large table CNC routers, a 12 x 5 ft table with an Automatic Tool Changer(ATC) a 10 x 5 ft table with an ATC, an 8 ft x 5 ft table, and a 4 x4 ft table, the latter two used for 3-D carvings. The designs are made with the assistance of the latest vector and image graphics design and CADAM (Computer Assisted Design & Manufacturing) software. Our 3-D designers use Maya and Rhino 3-D to create our 3-D STL relief models. We use Aspire 3-D/2.5-D to create our CNC router tool path files which control our CNC precision routers (to an accuracy of 0.01 inches). We use Adobe Illustrator (AI) CS5 as our primary design software for the initial or preliminary design and proof development for our signs and plaques. For final production carving, we use Aspire, V-Carve Pro, Cut3D, and Shopbot PartWorks software packages. All of these computer programs have interchangeable files for seamless design integration, from the initial proof to controlling the CNC tool paths.
We start with customer inputs for a custom sign - how big, shape, text, art, location, how installed. Other inputs from the customer to our designer may be a photo, a rough or finished drawing, or a reference to a sign or art on our website. Using these inputs, our designers develop one or more 2-D proofs using Adobe Illustrator, and send them to the customer as JPEG files. After several design iterations between the customer and the designer, the customer approves a color proof we send him/her through email. This proof is in a JPEG file with an underlying vector image. The customer can then order the sign. We guarantee the sign will look exactly like the approved proof (except for minor variations in color because of printing or screen display differences between the customer equipment, our equipment, and paint color matching, which is also computerized using a computer-controlled mixer which gives consistent and accurate color matches). Generally we restrict our color choices to Pantone colors; however, we can match other paint color hues (such as Sherwin Williams and Dunn-Edwards ), or we can match a paint chip or unknown color swatch.
After the proof is approved, the designer produces a production proof for the shop (dimensions and tolerances, materials, exact color specifications, manufacturing notes, hanging hardware locations) also using Adobe Illustrator. The designer also develops the CNC cutter/router/carver manufacturing software files that will drive the CNC router and vinyl cutter machines.This requires transferring the Illustrator EPS file into Aspire/V-Carve, and then into the Shopbot tool path control software (PartsWorks).
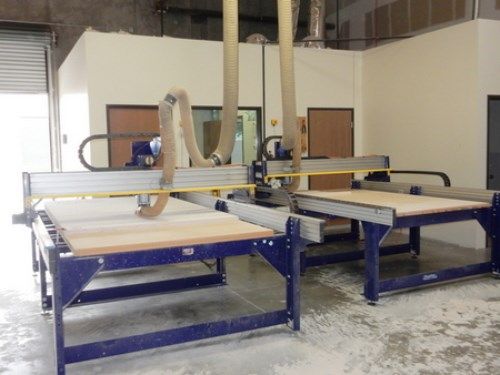
Fig 2 - Shopbot Large CNC Router/Carver Tables
We use five 5 x 10 ft PRS Alpha Shopbot CNC Router Tables with High-Speed 5HP spindles and an Automatic Tool Changer to cut out, route edges, carve letters, remove backgrounds, and perform 2.5-D and 3-D bas-relief carving and engraving on our wood and HDU signs.
We can design either 2-D, 2.5-D or 3-D (D stands for dimensional) carvings (2-D, or two dimensional, is a flat painted or vinyl applique sign with no relief, i.e.,a smooth flat surface - most signs, such as highway signs, for sale signs, etc. are 2-D); 2.5-D, which is flat relief, that is carving the sign into many raised or carved plateau-like areas, such as letters, borders, art, each with flat top surfaces. Another type of 2.5-D carving we sometimes use is outline relief, where thin lines (rather than areas) outlining shapes are raised above the background at the same level; the top of these lines are then painted. 3-D relief, sometimes called bas-relief, tequires carving the sign in a sculptured technique with curved top surfaces modeled with our 3-D software. We also often design engraved or recessed (incised) signs or plaques, where the text or artwork is carved into and below a flat surface. Text and borders can be engraved in either a V-carved (prismatic) profile or a flat-bottom profile. Artwork generally has a flat-bottom engraved profile.
We have library of over 1000 3-D art models that we can use "off-the-shelf" at a small additional cost compared to 2.5-D or flat art; alternatively, if necessary, we can create new custom 3-D object geometrical models at an additional setup cost above the price of a standard sign; or a third alternative is to hand-carved the 3-D art. We can create true 3-D text (rounded , prismatic, V-carved) at a small additional cost compared to 2.5-D text (flat top) . We can also create 2.5-D and 3-D art from our 30,000 pieces of 2-D vector and 3-D STL mesh clip art, or raster JPEG images, if necessary, but we always prefer to be provided vector (line) images (which are basically drawn pictures, rather than pixelated photo-type art). Finally, "engraving" is carving text, art and text onto a flat surface, in either a "V" profile or a rectangular profile (straight sides and flat bottom). For complex signs, we may use three, four or or even five of these carving techniques (i.e., 2.5-D flat relief, 2.5-D outline relief, engraving, 3-D bas-relief, and occasionally a 2-D vinyl decal applique, if the client wants a photo or very detailed small-scale art, too intricate to carve or hand-paint).
If the sign is to be sandblasted as well as cut/routed/CNC carved, which is often the case, the designer must also create a 2-D sandblast vinyl " rubberized" mask on a computer-controlled vinyl cutter using our software interfaced with a CNC driver. After the flat and raised surfaces have the mask manually applied to them, to protect them against the abrasive blast, the sign background is blasted with a high-capacity air compressor which sprays abrasive particles (they are not actually sand, but rather aluminum oxide) on the sign to create either a sandstone texture or wood grain texture using a wire screen to create random grooves in the background caused by shadowing of the abrasive blast. All of out sandblasted signs are first carved with out CNC routers, which are much more precise than sand-blasting alone. The design process must be very efficient. Our highly skilled and experienced designers can create a new custom design, from an initial proof to CNC router 2.5-D/3-D and vinyl cutter 2-D files, in an hour or so.
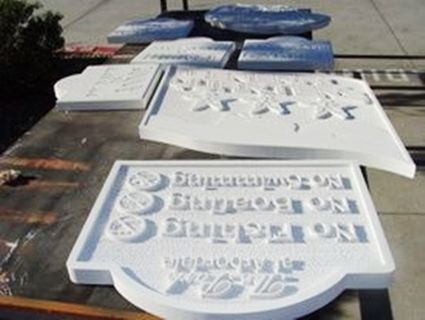
Fig. 3 - Unpainted Dimensional HDU Signs after Routing and Sandblasting has been Completed
These are a few of the HDU signs in a production run; some have raised text and art; others engraved text with a smooth background. We generally select 5 to 10 signs of the same material but different designs to be cut, CNC routed, sandblasted and painted as a group.
2. Cutting and carving the sign using a CNC router, sandblasting, power tools and hand tools. Compared to designing the sign, actually cutting and carving the sign is straightforward with computer-controlled automated tools. We manufacture our signs in a 10,000 ft2 facility in Murrieta, CA, where we have our two large-table (5 x 10 ft) CNC routers, sandblast booth, vinyl cutters, paint spray booths, drying racks, and design facilities co-located. Usually we start with either a 5 ft x 10 ft or 5 ft x 8 ft sheets of either HDU, Redwood or Cedar. The Redwood or Cedar sheets are 1.5 in thick strips laminated together under high pressure; the HDU sheets are usually 1.5 or 2 inches thick. Thicker signs use two or more sheets laminated together with epoxy. For small wood signs, we may use a single plank of Redwood, ,Cedar, Mahogany or Oak up to 12 inches wide and 1.5 inches thick. We put the sheet of raw material (wood, HDU, PVC, Acrylic, HDPE, or MDO) on the CNC router table and usually make several signs (4 to 10 smaller ones, or one very large one) from a single 5 x 8 or 5 x 10 ft sheet. These can have different shapes and sizes and patterns, We load the design data into the CNC computer and press "go", and voila, the automated router/carver cuts all the different signs out, and carves each them to their prescribed 2.5-D or 3-D designs. It may take many hours to cut all the signs on a full sheet, but only about 30-45 minutes for a single small sign. There may also be several tool bit changes on the spindle during the carving of a single sign; we have an automated tool changer that is programmed to change up to 6 tools per sign automatically. 3-D signs take much longer to carve than 2.5-D signs because very thin ball-nose bits (1/16 or even 1/32 inch diameter ) must be used to create a smooth curved surfaces; our record is 37 hours on the router for a single large intricate 3-D sign (our routers can run overnight without operator supervision).
We use Precision Board Plus High-Density-Urethane (HDU) sheets from Coastal Enterprises. We use only 20 lb/ft3 superior grade HDU for most of our signs, and 30 lb/ft3 extra strength HDU for signs where physical impact could damage the sign. Nearly all other sign manufacturers use 15 lb/ft3 HDU to save money, but we have found this weight of HDU breaks more easily and leaves a rougher, less professional sign. We also do precision cutting of metal, usually aluminum or steel, using our routers or a high-pressure water jet cutter. We can make precision metal text faces, separate dimensional letters and art, and elaborate and decorative metal-works for the sign. We have full welding, cutting, bending, and forging capabilities.
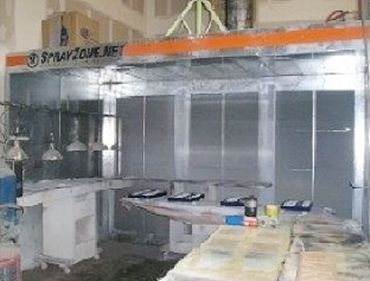
Fig 4 - Paint Spray Booth for Sign Painting
We use this booth with high-pressure air from a large compressor and clean air flow to spray on primer, background colors, stains, metal plating, and clear coats.. Detailed text and artwork painting, metal polishing, and gold-leaf gilding is done in our Fine Painting & Finishing shop.
After the router is done, each sign is punched out of the sheet, its edges sanded, and top surfaces hand-sanded where needed to provide a smooth finish. If the background is to be sandblasted, the sandblast mask is cut on our CNC vinyl cutter machine, applied manually to the protected surfaces, and put into the sandblast booth to be blasted by an operator wearing an oxygen mask and protective clothing. A CNC routed sign is only lightly sandblasted just to give its background a surface texture (sandstone or wood grain); nearly all the required background material has already been removed by the CNC router (up to 1 inch deep). Use of the CNC router gives a much cleaner, sharper dimensional look, and much deeper relief than sand-blasting alone can achieve (typically 1/4 inch relief). It is also much faster so the blast operator need be inside the booth for only 15 minutes instead of hours for a typical completely sandblasted sign
After the sign has been routed and sandblasted, any drilling or planing is done, and the sign is inspected for any defects and then fine sanded by hand, ready for the final phase, application of all its coatings.

Fig. 5 - Signs being Painted in Our Paint Shops
Our expert painters use paint spray booths, specially built micro-rollers, airbrushes, artist brushes, and proprietary stain applicators and masks to apply our primers, background paints, trim and lettering paint, and clear-coats. Metal plaques are finished with machine and hand-polishing equipment to provide a high sheen. 24K gold-and silver leaf gilding is applied on text, trim and artwork, and burnished by our most experienced artisans.
3. Priming, painting, staining, gold-leaf gilding, clear-coating,metal-coating etc. Applying finishing coatings in the carved wood or HDU sign or plaque is the most time-consuming and labor-intensive step, and represents about half the cost of the sign. Typically we put 8 to 10 coats of different materials on our signs. For painted wood signs, we use an acrylic polyurethane primer on the entire sign, front and back; then spray on two coats of background color (either Matthews acrylic polyurethane (MAP) sign paint or Sherwin Williams premium exterior latex house paint); then roll on artist-brush painting two coats of 1-Shot sign lettering oil enamels; then use a fine artist brush and/or airbrush to paint fine details; and finally spray on two coats of a Matthews two-part automotive-type urethane clear-coat for UV protection. We use only low VOC paints to minimize environmental effects.
For natural wood signs (see Product Line 3 for examples), we brush on one to three coats of stain; one coat of primer and two coats of Matthews One-Shot sign lettering enamels on text, border and art; and finally spraying on two coats of Matthews clear-coat for UV protection on the entire sign. For very rustic signs, we do not apply the clear-coats so as to let the sign age naturally.
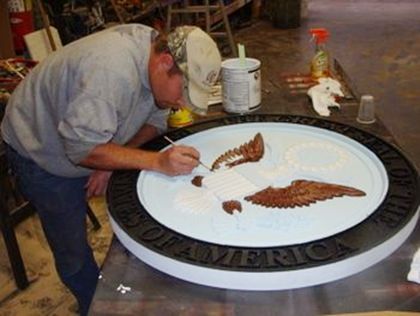
Fig 6 - Artist painting details on a wall plaque of the US Great Seal/font>
We use artist brushes, mini-rollers, and airbrushes to apply our Mathews polyurethane and 1-Shot sign enamel paints to 2.5-D and 3-D artwork and text. Some of this art will also be gold-leaf gilded.
For metal-coating our signs (See Product Line 7 for examples), we use a proprietary metal product made by Landmark Metalcoat Corp. this is applied with a paint spray gun. It comes in liquid form, and contains metal particles suspended in a binder. It is cold-sprayed on the sign or plaque, and then usually buffed to a high polish.This creates the look and feel of solid cast metal. The metal coating has a living finish and will age naturally over time. We also may create other special effects, such as scorching wood signs with a torch for a rustic appearance;making a driftwood effect by sandblasting and a special stain; and bronzing plaques.
We use several tools to do the coatings. For primer, background painting and clear-coats, we use a high-performance spray gun in a large paint spray booth. For raised text, borders and art, we use specially-designed mini-rollers. We use artist brushes and airbrushes for fine detail. We use hand burnishing tools for gold and silver leaf. Stain is applied with a large brush.We also have a drying room to reduce the time between coats, which is typically one day, so the entire coating process may take 8 to 10 days after the sign has been cut and carved. All of our top-coats have an anti-graffiti capability. It is relatively easy to remove sprayed-on graffiti paint using paint thinner.
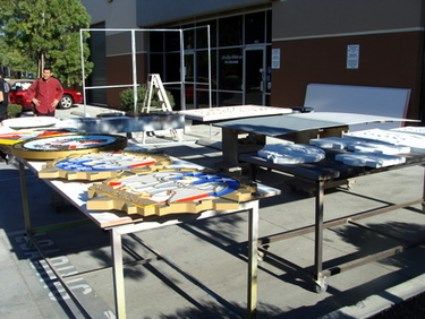
Fig 7 - A Production Run of 22 Painted Signs Drying in the California Sun
We manufacture our signs in groups of similar designs , with a production run varying from 10 to 200 similar signs, depending on their size
How do I make a wood sign by hand without computers and expensive equipment? Of course, custom wood signs can still be made the old-fashioned way, by hand-carving with hand-tools and/or by using hand-held power tools (saws, routers, sanders). We used to make signs entirely this way, but we no longer do so, because we would have to charge at least 3 times as much to cover the additional labor required. Furthermore, completely hand-crafted signs (i.e, no computers or computer-controlled tools) do not have the precision or professional look that computer-designed and manufactured signs do; they are acceptable only for very rustic looking carved signs.
However, if you wish to make your own dimensional wood or HDU signs, it is a noble but time-consuming and exacting endeavor, and we wish you the best of luck. Smaller signs are easier to make than larger signs, especially to design and lay them out. The traditional way of handcrafting wood signs without benefit of computers is to first lay the sign design out with pencil, ruler, french curves, protractor on a large sheet of paper equal to the size of the sign. Then, using carbon paper, trace the drawing on top of the signboard with carbon paper so that the shape, text, border, and art outlines are shown on the wood. Cut out the outline of your sign and route the edges with a hand-held power router. You can also use a power router with a stop to remove the signboard background to leave letters, borders, and art raised. You can then do 3-D carving with chisels, knives, rasps and veniers .
Alternatively , you can buy sandblast mask by the roll (it is $100/roll) and using the paper design template, transfer the design onto the mask using carbon paper. You can then cut out with a knife and scissors the mask containing separate letters, art pieces, borders and adhere the mask with its adhesive back onto the signboard. If you do not have a large sandblast facility, you can contract this operation out to an automotive or metal sandblast shop (only if the operator has lots of experience sandblasting wood or HDU signs) or better, a sign manufacturing shop with sandblast capabilities if they are willing to do it (most will not). You must be careful to have the right ablative materials , air flow rate and pressure, otherwise you will damage the wood or HDU or cause unattractive unevenness (ripples) in the background..
Painting or staining will be similar to Phase 3 above. It will be helpful to have a high-quality paint spray gun for primer and background colors, and mini-rollers , airbrushes and artist brushes for text, borders and art.
It is very impractical to build a large dimensional wood sign with raised letters and art with only hand tools such as chisels, knives, rasps and veniers. Too much wood must be removed and it will be removed too unevenly. It will also take many days to weeks to carve a large wooden sign, whereas we can do it in half an hour using the right automated equipment. It is like digging a swimming pool with a spoon - it can be done, but who would want to do it?. However, engraved (incised) text and art signs are more amenable to hand-carving. V-carved letters, art and borders can made in a reasonably short period of time using chisels and sandpaper only, but it is much faster to use a hand-held power router with a V-bit or flat-bottomed bit.A router requires a very steady hand and preferably a template.
You will be effectively earning between $2/hr (hand tools) and $5/hr (hand-held power router) with your labor if you want to carve your own wood sign, compared to having a professional sign company do it with computer-controlled machines. You will also pay between 50% and 100% more for your wood or HDU materials compared to a large volume sign company like Art Sign Works, because we buy our materials at wholesale prices in bulk at deep discounts.